These are my Beribboned Wrists pattern knit with Malabrigo Worsted in Natural for the body and i-cord knit with Socks That Rock Mediumweight in On Blueberry Hill to lace them up instead of ribbon. I love the rainbow effect of the color changes in the STR paired with the simplicity of the super-soft Malabrigo, don't you?
I knit the Worsted size but 'accidentally' knit the DK chart for it. The only real difference is that the DK chart is a bit longer. I decided to add the optional afterthought thumbs that turn these into fingerless mitts instead of wristwarmers. They are a tad small for me, but since they are intended to be gifted to a young girl, that's ok! If you've never knit an afterthought thumb before, you should give it a try because they are pretty simple and since they don't involve shaping they are a flexible method for modifying patterns. You knit until the point where you'd like the thumb to be, then you knit a few stitches with waste yarn, turn your work and purl back over those waste yarn stitches, then resume knitting in the round with your regular yarn, and forget all bout the thumb until the end!
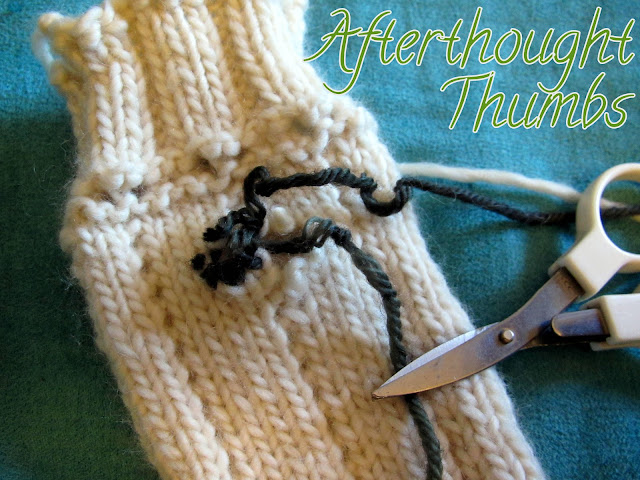
When you are ready to add the thumb, you unravel your waste yarn. With the extra-fuzzy Malabrigo I lost patience unraveling so I opted to cut the waste yarn out. Just be careful where you snip!
This will give you a bunch of live thumb stitches to deal with. You will have one more stitch on the bottom than on the top. I start by picking up a side stitch and all the bottom stitches on one needle. Then I flip the mitt and pick up a side stitch, all the top stitches, and another side stitch. These 'side stitches' are just any old random stitches on the edge of the thumb hole that you grab to try to prevent gaps from forming when you begin knitting in the round. It really doesn't seem to matter which ones you pick up, as long as you aren't forming holes when you grab them.
After I have both sets picked up, I split the bottom stitches onto two needles. Then I join my working yarn on the bottom right of the thumb hole and begin knitting clockwise in the round. After that it's just following the pattern for a few rows and binding off!
It's tough to see in this pic, but sometimes you still get gaps near the start of the round no matter how many extra stitches you pick up. When this happens, I take the tail of my yarn and work it into the fabric to close up the gap. Works like a charm! And the really neat thing about afterthought thumbs is that if you decide you don't want a thumb later on after all, you can just remove the waste yarn, put the stitches on two needles, and use kitchener stitch to graft them together with matching yarn. If you do it neatly and weave in your ends securely, nobody will ever know there should've been a hole there! The only downside to these thumbs is that they can sometimes distort the pattern due to the lack of shaping to accommodate the base of the thumb (like in a gusset), but I think despite that they are useful, quick, and look just fine with many patterns. (I'll have you know I had to try really hard to resist saying something about giving them a thumbs up. You're welcome.)
 |
| Come join the KAL on Ravelry through 12/31/12! |


I actually prefer the gloves with the i-cord, it is just so original and the colorway choice is so vibrant that it really stands out against the white. I might be weird, but I kind of enjoy afterthought thumbs.
ReplyDeleteThey're not bad, and thank you! I really like the i-cord, too, although it took me what felt like forever to knit.
DeleteGorgeous! The rainbow goes so well with the white! And I'm with Pumpkin, I love afterthought thumbs, I am glad I had to learn them for your pattern :)
ReplyDeleteMan I missed a lot by not checking my blog feed for 3 days!
Haha, glad you like them!
Delete